
<?xml version="1.0" encoding="UTF-8"?>
<feed xmlns="http://www.w3.org/2005/Atom">
   <title>LS-GL/HS-DHGL ハックキット</title>
   <link rel="alternate" type="text/html" href="http://www.yamasita.jp/linkstation/ls-gl/hackkit/" />
   <link rel="self" type="application/atom+xml" href="http://www.yamasita.jp/linkstation/ls-gl/hackkit/atom.xml" />
   <id>tag:www.yamasita.jp,2008:/linkstation/ls-gl/hackkit/7</id>
   <updated>2008-03-08T05:25:40Z</updated>
   
   <generator uri="http://www.sixapart.com/movabletype/">Movable Type Publishing Platform 4.01</generator>


<entry>
   <title>はじめに</title>
   <link rel="alternate" type="text/html" href="http://www.yamasita.jp/linkstation/ls-gl/hackkit/intro.html" />
   <id>tag:www.yamasita.jp,2007:/linkstation/ls-gl/hackkit//7.408</id>
   
   <published>2007-07-28T16:00:00Z</published>
   <updated>2007-09-29T14:34:22Z</updated>
   
   <summary>概要 LinkStation LS-GL シリーズ、HS-DHGL シリーズに ...</summary>
   <author>
      <name></name>
      
   </author>
   
   
   <content type="html" xml:lang="ja" xml:base="http://www.yamasita.jp/linkstation/ls-gl/hackkit/">
      <![CDATA[<h2>概要</h2>
<ul>
LinkStation LS-GL シリーズ、HS-DHGL シリーズに
<a href="../debian/index.html">
debian をインストールする手順</a>を
紹介していますが、
あまりにも手順が多くすごく敷居の高いものになっています。
<p>
LS-GL/HS-DHGL ハックキットは<br>
・あらかじめ実行できるところは実行してアーカイブ<br>
・標準ファームからのコピーや
環境に合わせるための処理はシェルスクリプトに<br>
としたものです。
<p>
LS-GL/HS-DHGL ハックキットを使えば、
debian のインストールが格段に容易になります。
</ul>

<h2>LS-GL/HS-DHGL ハックキットの配布</h2>
<ul>
LS-GL/HS-DHGL ハックキットは CD-R でのみ配布しています。
<h3>配布実費</h3>
<ul>
配布に伴う費用として
（送料、メディア代等どんぶり勘定にはなりますが）
実費程度をご負担ください。<br>
「商品」「代金」「購入」等の用語を
お使いになる方がいらっしゃいますが、
決して営利目的での販売ではありません。
<p>
なお、ネットワーク経由の提供はしていません。ご了承ください。<br>
<p>
ハックキットを作る完全な手順を
<a href="../debian/index.html">
debian をインストールする手順</a>で公開しています。<br>
「実費なんていやだ」という方は、、、、
<a href="../debian/index.html">
debian をインストールする手順</a>を実行してください。<br>
結構おもしろいと思いますよ。
</ul>
<h3>ハックキット配布のお申し込み</h3>
<ul>
下記フォーム
</ul>
<pre>
----------------------------------------
＜LS-GL/HS-DHGL ハックキット申し込み＞
お名前：
郵便番号：（半角 3桁-4桁）
ご送付先：
使用予定機種：LS-GL, HS-DHGL（選択ください）
----------------------------------------
</pre>
<ul>
に必要事項を記入の上、
メールで山下（yasunari ＠ yamasita.jp）までお申し込みください。<br>
（このメールアドレスは細工してあります。
＠を半角に、＠前後の空白は取り除いてください）<br>
折り返し詳細をご連絡させていただきます。
</ul>
</ul>

<h2>ソースコードの入手</h2>
<ul>
debian 由来のバイナリのソースは debian のサイトから入手下さい。
</ul>

<h2>関連ページ</h2>
<ul>

<h3><a href="http://www.yamasita.jp/cgi-bin/BBS/eztree.cgi">
Hack BBS</a></h3>
<ul>
このページの相互サポート BBS です。<br>
ハックキットに関する
<li>技術的なご質問</li><br>
<li>インストールレポート</li><br>
<li>対応情報</li><br>
<li>動作報告</li><br>
なども
<a href="http://www.yamasita.jp/cgi-bin/BBS/eztree.cgi">この BBS <a>
にお願いします。
<p>
ハックキット配布に関するお問い合わせはメールでお受けしますが、
<font color="red">技術的なご質問はメールではお受けいたしかねます
</font>のでご承知置きください。
<p>
<a href="http://www.yamasita.jp/cgi-bin/BBS/eztree.cgi">
Hack BBS</a>についての詳細は
<a href="/BBS/aboutbbs.html">
Hack BBS について</a> を参照ください。<br>
<a href="/BBS/index.html">過去ログ</a>も、ぼちぼち置いてます。
</ul>

</ul>
]]>
      
   </content>
</entry>

<entry>
   <title>必要なもの</title>
   <link rel="alternate" type="text/html" href="http://www.yamasita.jp/linkstation/ls-gl/hackkit/things.html" />
   <id>tag:www.yamasita.jp,2007:/linkstation/ls-gl/hackkit//7.409</id>
   
   <published>2007-07-28T17:00:00Z</published>
   <updated>2008-01-19T06:42:18Z</updated>
   
   <summary>LinkStation LS-GL/HS-DHGL シリーズで debian を...</summary>
   <author>
      <name></name>
      
   </author>
   
   
   <content type="html" xml:lang="ja" xml:base="http://www.yamasita.jp/linkstation/ls-gl/hackkit/">
      <![CDATA[LinkStation LS-GL/HS-DHGL シリーズで debian を動作させるために必要なもの

<h2>LinkStation LS-GL/HS-DHGL シリーズ</h2>
<ul>
これがないと始まりません（笑）<br>
</ul>

<h2>実験用 HDD</h2>
<ul>
LS-GL/HS-DHGL についてきた HDD は温存しておいて、
実験用の HDD を使用することをお勧めします。<br>
</ul>

<h2>HDD アダプタ（？）</h2>
<ul>
上記実験用 HDD は<br>
（１）インストール中には LS-GL/HS-DHGL に USB で、<br>
（２）debian 起動時には LS-GL/HS-DHGL に S-ATA で<br>
接続します。<br>
S-ATA の HDD を使用する場合には USB へのアダプタ、<br>
IDE   の HDD を使用する場合には S-ATA へのアダプタと USB へのアダプタ、<br>
が必要となります。
</ul>

<h2>操作用マシン</h2>
<ul>
ハックキットの CD-R を読込んで LS-GL/HS-DHGL に転送したり、<br>
LS-GL/HS-DHGL に telnet したりするのに使用します。
</ul>

<h2>Linux マシン</h2>
<ul>
標準ファームの HDD を接続、
telnet できるようにしたり、root のパスワードを消したりするのに使用します。
</ul>
]]>
      
   </content>
</entry>

<entry>
   <title>ログインできるようにする</title>
   <link rel="alternate" type="text/html" href="http://www.yamasita.jp/linkstation/ls-gl/hackkit/lsglhsdhgl.html" />
   <id>tag:www.yamasita.jp,2007:/linkstation/ls-gl/hackkit//7.621</id>
   
   <published>2007-07-28T17:30:00Z</published>
   <updated>2008-01-19T06:45:21Z</updated>
   
   <summary>LS-GL/HS-DHGL にハックキットをインストールするには、 LS-GL/...</summary>
   <author>
      <name></name>
      
   </author>
   
   
   <content type="html" xml:lang="ja" xml:base="http://www.yamasita.jp/linkstation/ls-gl/hackkit/">
      <![CDATA[LS-GL/HS-DHGL にハックキットをインストールするには、
LS-GL/HS-DHGL で標準ファームが動作していて、
シリアルコンソールか telnet で LS-GL/HS-DHGL の標準ファームに
ログインでき、root になれるようになっていなければなりません。
<p>
ここでは、telnet して LS-GL/HS-DHGL の標準ファームに
root でログインできるようにする手順を紹介します。<br>
以下、LS-GL/HS-DHGL シリーズを総称して LS-GL と記述します。 

<h2>LS-GL の HDD を取り出す</h2>
<ul>
LS-GL の HDD を取り出します。
</ul>

<h2>LS-GL の HDD を玄箱/Pro に SATA で接続</h2>
<ul>
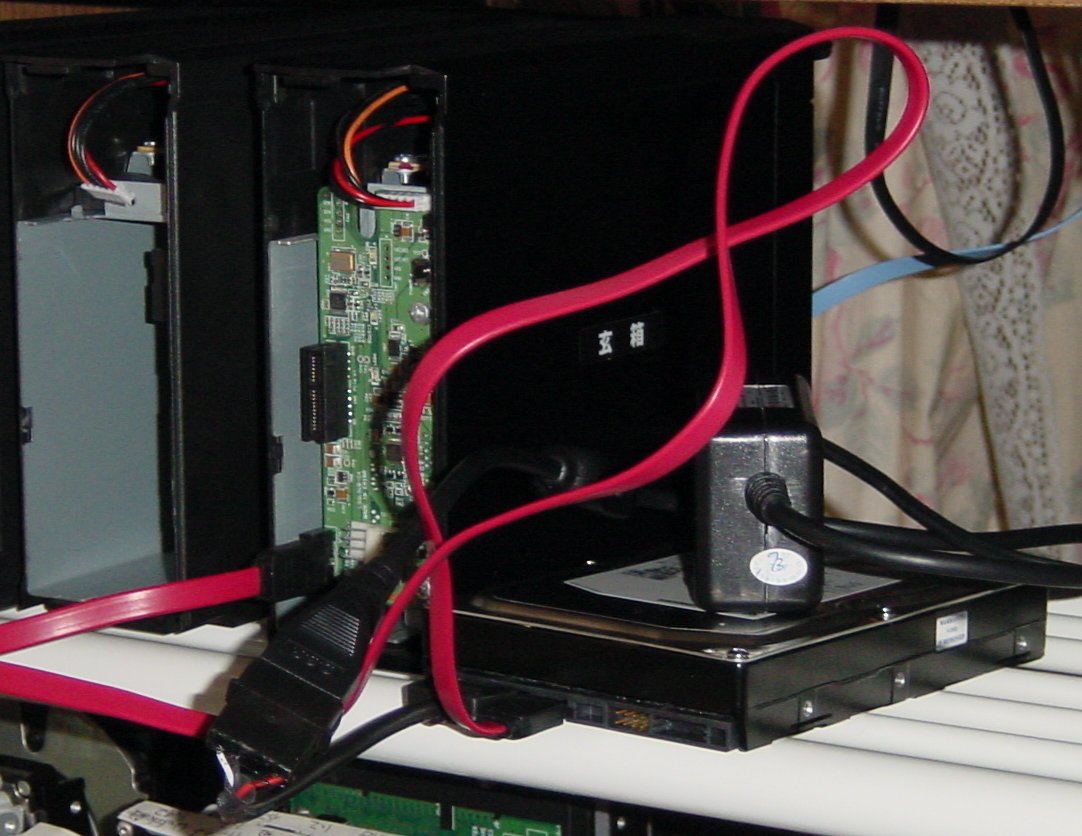
ここでは、LS-GL の HDD を玄箱/Pro に SATA で接続して
中身を書き換える方法を紹介します。<br>
他の Linux マシンに接続する場合もほぼ同じです。
<p>
玄箱/Pro のフロントパネル裏の SATA に LS-GL の HDD を接続、
HDD は別途電源を接続し、玄箱/Pro の電源を入れます。
<p>
<a href="http://www.yamasita.jp/linkstation/2008/01/080124_1l.jpg" target="_blank">
<img src="http://www.yamasita.jp/linkstation/2008/01/080124_1s.jpg"></a>
</ul>

<h2>玄箱/Pro にログイン、root になる</h2>
<ul>
玄箱/Pro に telnet してログイン、root になります。
<pre>
Debian GNU/Linux 4.0
kup login: yasunari
Password:
Last login: Sat Jan 19 14:15:59 2008 from uxl.yamasita.jp on pts/0
Linux kup 2.6.12.6-arm1 #27 Tue Apr 10 22:47:16 JST 2007 armv5tejl

The programs included with the Debian GNU/Linux system are free software;
the exact distribution terms for each program are described in the
individual files in /usr/share/doc/*/copyright.

Debian GNU/Linux comes with ABSOLUTELY NO WARRANTY, to the extent
permitted by applicable law.
yasunari@kup:~$ su - root
Password:
kup:~#
</pre>

</ul>

<h2>LS-GL の HDD を認識しているか確認</h2>
<ul>
dmesg で LS-GL の HDD を認識しているか確認します。

<pre>
kup:~# dmesg | less
	:
	:
scsi0 : Marvell SCSI to SATA adapter
scsi1 : Marvell SCSI to SATA adapter
  Vendor: Seagate   Model: ST3120026AS       Rev: 3.18
  Type:   Direct-Access                      ANSI SCSI revision: 03
  Vendor: SAMSUNG   Model: HD321KJ           Rev: CP10
  Type:   Direct-Access                      ANSI SCSI revision: 03
SCSI device sda: 234441648 512-byte hdwr sectors (120034 MB)
SCSI device sda: drive cache: write back
SCSI device sda: 234441648 512-byte hdwr sectors (120034 MB)
SCSI device sda: drive cache: write back
 sda: sda1 sda2 sda3 sda4
Attached scsi disk sda at scsi0, channel 0, id 0, lun 0
SCSI device sdb: 625142448 512-byte hdwr sectors (320073 MB)
SCSI device sdb: drive cache: write back
SCSI device sdb: 625142448 512-byte hdwr sectors (320073 MB)
SCSI device sdb: drive cache: write back
 sdb: sdb1 sdb2 sdb4 < sdb5 sdb6 >
Attached scsi disk sdb at scsi1, channel 0, id 0, lun 0
Attached scsi generic sg0 at scsi0, channel 0, id 0, lun 0,  type 0
Attached scsi generic sg1 at scsi1, channel 0, id 0, lun 0,  type 0
	:
	:
</pre>
この例では、sdb と認識しています。
</ul>
<h2>LS-GL の HDD のマウント</h2>
<ul>
マウントポイントとして/tmp/root を作成し、<br>
/ パーティション(/dev/sdb2)をマウントします。
<pre>
kup:~# mkdir /tmp/root
kup:~# mount /dev/sdb2 /tmp/root
kup:~# ls /tmp/root
bin  boot  dev  etc  home  lib  lost+found  mnt  proc  root  sbin  share  sys  tmp  usr  var  www
kup:~#
</pre>
</ul>
<h2>telnetd が起動するようにする</h2>
<ul>
<h3>telnetd の確認</h3>
<ul>
まずは、telnetd があるか確認します。
<pre>
kup:~# cd /tmp/root
kup:/tmp/root# ls -l usr/sbin/telnetd
lrwxrwxrwx 1 root root 17 Nov  6 16:07 usr/sbin/telnetd -> ../../bin/busybox
kup:/tmp/root#
</pre>
このように、usr/sbin/telnetd が ../../bin/busybox に
シンボリックリンクされていれば OK です。
</ul>

<h3>etc/init.d/rcS のバックアップ</h3>
<ul>
念のためバックアップしておきます。<br>
mv でリネームしてからコピーしているのは、
オリジナルのタイムスタンプやオーナ、モードを保存するためです。
<pre>
kup:/tmp/root# cd etc/init.d/
kup:/tmp/root/etc/init.d# mv rcS rcS.orig
kup:/tmp/root/etc/init.d# cp rcS.orig rcS
kup:/tmp/root/etc/init.d# ls -l rcS*
-rwxr-xr-x 1 root root 977 Jan 19 14:43 rcS
-rwxr-xr-x 1 root root 977 Oct 11 21:32 rcS.orig
kup:/tmp/root/etc/init.d#
</pre>
ls -l で見て、パーミッション(-rwxr-xr-x)、
オーナ（root）、グループ（root）が同じであれば、OK です。
</ul>
<h3>etc/init.d/rcS の編集</h3>
<ul>
最近のファームウェアには telnetd 起動ステップは
コメントアウトされていないので、
telnetd 起動ステップを追加します。
<pre>
kup:/tmp/root/etc/init.d# vi rcS
	:
	:
echo "** step2 **"
for cmd in networking.sh syslog.sh inetd.sh kernelmon.sh miconmon.sh mount_share.sh diskmon.sh errormon.sh hotplug.sh
ups
do
        exec_sh $cmd
done

<u>/usr/sbin/telnetd</u>
#
echo "** step3 **"
for cmd in micon_setup.sh atalk.sh ftpd.sh httpd.sh smb.sh clientUtil_servd.sh lsprcvd.sh daemonwatch.sh cron.sh logch
kd.sh checkconfig.sh
do
        exec_sh $cmd
done
</pre>
下線部を追加します。
</ul>
</ul>
<h2>root のパスワードをつぶす</h2>
<ul>
標準ファームの root のパスワードはわからないので、
ファイルを編集して消してしまいます。

<h3>/etc/shadow のバックアップ</h3>
<ul>
同じく念のためバックアップを取ります。
<pre>
kup:/tmp/root/etc/init.d# cd ..
kup:/tmp/root/etc# mv shadow shadow.orig
kup:/tmp/root/etc# cp shadow.orig shadow
kup:/tmp/root/etc# ls -l shadow*
-r-------- 1 root root 370 Jan 19 14:51 shadow
-r-------- 1 root root 370 Oct 11 21:32 shadow.orig
kup:/tmp/root/etc#
</pre>
</ul>
<h3>暗号化されたバスワードを消す</h3>
<ul>
<pre>
kup:/tmp/root/etc# vi shadow
	:
	:
root:（暗号化されたパスワード）:11009:0:99999:7:::
</pre>
この暗号化されたパスワードを消し、
<pre>
root::11009:0:99999:7:::
</pre>
と変更します。
<p>
このファイルは read only のファイルなので、<br>
vi で :wq としても
<pre>
E45: 'readonly' option is set (add ! to override)
</pre>
と怒られ、保存できません。<br>
<pre>
:w!
:q
</pre>
として、保存、終了します。
</ul>
</ul>
<h2>LS-GL の HDD のアンマウント</h2>
<ul>
シャットダウンするので、アンマウント不要といえば不要ですが、
作法として（？）アンマウントしておきます。
<p>
カレントディレクトリが /tmp/root 以下、
つまりマウントした LS-GL の HDD の中であれば
アンマウントできないので、
外（ここでは /）に出てからアンマウントします。
<pre>
kup:/tmp/root/etc# cd /
kup:/# umount /tmp/root
kup:/#
</pre>
</ul>
<h2>玄箱/Pro からログアウト</h2>

<h2>玄箱/Pro をシャットダウン</h2>
<ul>
電源ボタン長押しでシャットダウンします。
</ul>

<h2>LS-GL の HDD を LS-GL に戻す</h2>
<ul>
逆の手順で、HDD を戻します。
</ul>

<h2>LS-GL の電源 ON</h2>
<ul>
</ul>

<h2>LS-GL に telnet</h2>
<ul>
<pre>

BUFFALO INC. LinkStation series LS-GL(IESADA)
LS-GL530 login: root
root@LS-GL530:~#
</pre>
</ul>
<hr>
<h2>参考ハックの記録</h2>
<ul>
<a href="/linkstation/0608/060808.html">
LS-GL：シリアルコンソール</a><br>

<a href="/linkstation/0607/060727.html">
LS-GL：ファームウェアの散歩
</a>（telnet 可能に）<br>

<a href="/linkstation/2007/06/070605_lsgl_110_telnet.html">
LS-GL ファームウェア 1.10 の telnet 可能化</a><br>

<a href="/linkstation/2007/08/070812_lsgl_ver111telnet.html">
LS-GL シリーズ ファームウェア アップデータ　Ver.1.11（３）telnet 可能化
</a><br>

<a href="/linkstation/2007/04/070423_hsdhgl_ver106_telnet.html">
HS-DHGL ファームウェア Ver.1.06 に telnet
</a><br>

<a href="/linkstation/2007/06/070626__110_telnet.html">
(HS-DHGL)ファームウェア 1.10 の telnet 可能化
</a><br>

<a href="/linkstation/0607/060728.html">
LS-GL：root のパスワードの変更
</a><br>

<a href="/linkstation/2007/04/070424_hsdhgl_ver106_root.html">
HS-DHGL ファームウェア Ver.1.06 の root のパスワードの変更
</a><br>

</ul>
]]>
      
   </content>
</entry>

<entry>
   <title>インストール</title>
   <link rel="alternate" type="text/html" href="http://www.yamasita.jp/linkstation/ls-gl/hackkit/install.html" />
   <id>tag:www.yamasita.jp,2007:/linkstation/ls-gl/hackkit//7.410</id>
   
   <published>2007-07-28T18:00:00Z</published>
   <updated>2007-08-23T06:29:46Z</updated>
   
   <summary>LinkStation LS-GL/HS-DHGL シリーズへハックキットをイン...</summary>
   <author>
      <name></name>
      
   </author>
   
   
   <content type="html" xml:lang="ja" xml:base="http://www.yamasita.jp/linkstation/ls-gl/hackkit/">
      <![CDATA[LinkStation LS-GL/HS-DHGL シリーズへハックキットをインストールする方法<br>
以下、LinkStation LS-GL/HS-DHGL シリーズを総称して LS-GL と記述します。

<h2>LS-GL ハックキットのファイルの転送</h2>
<ul>
LS-GL ハックキットの CD-R に納めている<br>
・LS-GL_hackkit_<i>Ver.</i>.sh<br>
・LS-GL_hackkit_<i>Ver.</i>.tar.gz<br>
を LS-GL の
/mnt/disk1/share/debian に転送します。<br>
転送には ftp かファイル共有を使用します。
<p>
注：<i>Ver.</i> は LS-GL ハックキットのバージョンです。
</ul>

<h2>ログイン</h2>
<ul>
LS-GL にログインし、root になります。
</ul>

<h2>カスタマイズ</h2>
<ul>
LS-GL_hackkit_<i>Ver.</i>.sh の最初の方に
<pre>
ADDRESS=192.168.1.38
NETWORK=192.168.1.0
NETMASK=255.255.255.0
BROADCAST=192.168.1.255
GATEWAY=192.168.1.1
NAMESERVER=192.168.1.2
HOSTNAME=hackkit
</pre>
という部分がありますから、この部分を環境に合わせます
<table border>
<tr><td>変数</td><td>内容</td><td>デフォルト値</td></tr>
<tr><td>ADDRESS</td>
<td>LS-GL の IP アドレス</td>
<td>192.168.1.38</td></tr>

<tr><td>NETWORK</td>
<td>LS-GL を接続するネットワークアドレス</td>
<td>192.168.1.0</td></tr>

<tr><td>NETMASK</td>
<td>LS-GL を接続するネットワークのネットマスク</td>
<td>255.255.255.0</td></tr>

<tr><td>BROADCAST</td>
<td>LS-GL を接続するネットワークのブロードキャストアドレス</td>
<td>192.168.1.255</td></tr>

<tr><td>GATEWAY</td>
<td>デフォルトゲートウェイ</td>
<td>192.168.1.1</td></tr>

<tr><td>NAMESERVER</td>
<td>ネームサーバの IP アドレス</td>
<td>192.168.1.2</td></tr>

<tr><td>HOSTNAME</td>
<td>LS-GL のホスト名</td>
<td>hackkit</td></tr>
</table>
</ul>

<h2>HDD の接続</h2>
<ul>
インストールする HDD を USB で接続します。<br>
/dev/sdb として認識されます。<br>
認識されていれば、/var/log/messages に以下のようなログが残ります。

<pre>
Jan 10 23:27:46 UDE kernel: usb 1-1: new high speed USB device using ehci_platform and address 2
Jan 10 23:27:47 UDE kernel: scsi2 : SCSI emulation for USB Mass Storage devices
Jan 10 23:27:52 UDE kernel:   Vendor: WDC WD16  Model:  WD-WCANM4151553  Rev: 2E02
Jan 10 23:27:52 UDE kernel:   Type:   Direct-Access                      ANSI SCSI revision: 02
Jan 10 23:27:52 UDE kernel: SCSI device sdb: 312581808 512-byte hdwr sectors (160042 MB)
Jan 10 23:27:52 UDE kernel: sdb: assuming drive cache: write through
Jan 10 23:27:52 UDE kernel: SCSI device sdb: 312581808 512-byte hdwr sectors (160042 MB)
Jan 10 23:27:52 UDE kernel: sdb: assuming drive cache: write through
Jan 10 23:27:52 UDE kernel:  sdb: sdb1 sdb2 sdb4 < sdb5 sdb6 >
Jan 10 23:27:52 UDE kernel: Attached scsi disk sdb at scsi2, channel 0, id 0, lun 0
Jan 10 23:27:52 UDE kernel: Attached scsi generic sg1 at scsi2, channel 0, id 0, lun 0,  type 0
Jan 10 23:27:53 UDE kernel: kjournald starting.  Commit interval 5 seconds
Jan 10 23:27:53 UDE kernel: EXT3 FS on sdb1, internal journal
Jan 10 23:27:53 UDE kernel: EXT3-fs: mounted filesystem with ordered data mode.
Jan 10 23:27:53 UDE nmbd[635]: [2007/01/10 23:27:53, 0] nmbd/nmbd.c:terminate(58)
Jan 10 23:27:53 UDE nmbd[635]:   Got SIGTERM: going down...
Jan 10 23:27:54 UDE kernel: NET: Registered protocol family 5
Jan 10 23:27:56 UDE kernel: NET: Unregistered protocol family 5
</pre>
接続した HDD が自動的にマウントされた場合は umount します。
<pre>
root@UDE:~# <u>df</u>
Filesystem           1k-blocks      Used Available Use% Mounted on
/dev/sda2               493212    172544    320668  35% /
/dev/ram1                15360        80     15280   1% /mnt/ram
/dev/ls_disk1_1         194443     68619    115785  37% /boot
/dev/ls_disk1_6        3363376    300860   3062516   9% /mnt/disk1
/dev/ls_usbdisk2_1      194443      4127    180277   2% /mnt/usbdisk2
root@UDE:~# <u>umount /mnt/usbdisk2/</u>
root@UDE:~# 
</pre>

</ul>

<h2>パーティションの設定</h2>
<ul>
パーティションを切ります。
<table  border>
<tr><td>パーティション</td>
<td>容量</td>
<td>システム</td>
<td>用途</td>
</tr>

<tr><td>/dev/sdb1</td>
<td>200MB</td>
<td>Linux</td>
<td>/boot</td>
</tr>

<tr><td>/dev/sdb2</td>
<td>2GB</td>
<td>Linux</td>
<td>/</td>
</tr>

<tr><td>/dev/sdb3</td>
<td>256MB</td>
<td>Linux swap</td>
<td>swap</td>
</tr>

<tr><td>/dev/sdb4</td>
<td>残り全部</td>
<td>Linux</td>
<td>データ</td>
</tr>
</table>
<p>
実行例：
<pre>
root@UDE:~# <u>fdisk /dev/sdb</u>

The number of cylinders for this disk is set to 19457.
There is nothing wrong with that, but this is larger than 1024,
and could in certain setups cause problems with:
1) software that runs at boot time (e.g., old versions of LILO)
2) booting and partitioning software from other OSs
   (e.g., DOS FDISK, OS/2 FDISK)

Command (m for help): <u>p</u>

Disk /dev/sdb: 160.0 GB, 160041885696 bytes
255 heads, 63 sectors/track, 19457 cylinders
Units = cylinders of 16065 * 512 = 8225280 bytes

   Device Boot      Start         End      Blocks   Id  System
/dev/sdb1               1          25      200781   83  Linux
/dev/sdb2              26          87      498015   83  Linux
/dev/sdb4              88       19457   155589525    5  Extended
/dev/sdb5              88         104      136521   82  Linux swap
/dev/sdb6             105       19457   155452941   83  Linux

Command (m for help): 
</pre>
もし上記のようにパーティションがあれば、
パーティションを消します
<pre>
Command (m for help): <u>d</u>
Partition number (1-6): <u>6</u>

Command (m for help): <u>d</u>
Partition number (1-5): <u>5</u>

Command (m for help): <u>d</u>
Partition number (1-5): <u>4</u>

Command (m for help): <u>d</u>
Partition number (1-6): <u>2</u>

Command (m for help): <u>d</u>
Selected partition 1

Command (m for help): <u>p</u>

Disk /dev/sdb: 160.0 GB, 160041885696 bytes
255 heads, 63 sectors/track, 19457 cylinders
Units = cylinders of 16065 * 512 = 8225280 bytes

   Device Boot      Start         End      Blocks   Id  System

Command (m for help):
</pre>
パーティションを切ります
<pre>
Command (m for help): <u>n</u>
Command action
   e   extended
   p   primary partition (1-4)
<u>p</u>
Partition number (1-4): <u>1</u>
First cylinder (1-19457, default 1): <u>[Enter]</u>
Using default value 1
Last cylinder or +size or +sizeM or +sizeK (1-19457, default 19457): +<u>200M</u>

Command (m for help): <u>n</u>
Command action
   e   extended
   p   primary partition (1-4)
<u>p</u>
Partition number (1-4): <u>2</u>
First cylinder (26-19457, default 26): <u>[Enter]</u>
Using default value 26
Last cylinder or +size or +sizeM or +sizeK (26-19457, default 19457): <u>+2096M</u>

Command (m for help): <u>n</u>
Command action
   e   extended
   p   primary partition (1-4)
p
Partition number (1-4): <u>3</u>
First cylinder (282-19457, default 282): <u>[Enter]</u>
Using default value 282
Last cylinder or +size or +sizeM or +sizeK (282-19457, default 19457): <u>+256M</u>

Command (m for help): <u>n</u>
Command action
   e   extended
   p   primary partition (1-4)
<u>p</u>
Selected partition 4
First cylinder (314-19457, default 314): <u>[Enter]</u>
Using default value 314
Last cylinder or +size or +sizeM or +sizeK (314-19457, default 19457): <u>[Enter]</u>
Using default value 19457

Command (m for help): <u>t</u>
Partition number (1-4): <u>3</u>
Hex code (type L to list codes): <u>82</u>
Changed system type of partition 3 to 82 (Linux swap)

Command (m for help): <u>p</u>

Disk /dev/sdb: 160.0 GB, 160041885696 bytes
255 heads, 63 sectors/track, 19457 cylinders
Units = cylinders of 16065 * 512 = 8225280 bytes

   Device Boot      Start         End      Blocks   Id  System
/dev/sdb1               1          25      200781   83  Linux
/dev/sdb2              26         281     2056320   83  Linux
/dev/sdb3             282         313      257040   82  Linux swap
/dev/sdb4             314       19457   153774180   83  Linux

Command (m for help): <u>w</u>
The partition table has been altered!

Calling ioctl() to re-read partition table.

WARNING: Re-reading the partition table failed with error 16: Device or resource busy.
The kernel still uses the old table.
The new table will be used at the next reboot.
Syncing disks.
root@UDE:~#
</pre>
</ul>

<h2>インストール</h2>
<ul>
スクリプトを実行します。
<pre>
root@UDE:/mnt/disk1/share/debian# <u>sh LS-GL_hackkit_<i>Ver.</i>.sh</u>
formating hard drive    ..
mke2fs 1.27 (8-Mar-2002)
Filesystem label=
OS type: Linux
Block size=1024 (log=0)
Fragment size=1024 (log=0)
50200 inodes, 200781 blocks
10039 blocks (5.00%) reserved for the super user
First data block=1
25 block groups
8192 blocks per group, 8192 fragments per group
2008 inodes per group
Superblock backups stored on blocks:
        8193, 24577, 40961, 57345, 73729

Writing inode tables: done
Creating journal (4096 blocks): done
Writing superblocks and filesystem accounting information: done

This filesystem will be automatically checked every 33 mounts or
180 days, whichever comes first.  Use tune2fs -c or -i to override.
	:
	:
creating network_interfaces ...
creating resolv.conf ...
creating hosts ...
creating hostname ...
root@UDE:/mnt/disk1/share/debian#
</pre>
<table border><tr><td>
ハックキット 1.00 の場合で、もし、
<pre>
mounting hard drive     ..
mount: Unknown error 990
root@UDE:/mnt/disk1/share/debian#
</pre>
とエラーで終わってしまうようなら、
LS-GL_hackkit_1.00.sh を修正し、
mount に -t ext3 オプションを付加します。
<pre>
***************
*** 31,37 ****
        then
                mkdir $MOUNTPOINT || exit
        fi
!       mount /dev/sdb2 $MOUNTPOINT || exit
  }
  #---------------------------------------------------------
  # extract hackkit archive
--- 31,37 ----
        then
                mkdir $MOUNTPOINT || exit
        fi
!       mount -t ext3 /dev/sdb2 $MOUNTPOINT || exit
  }
  #---------------------------------------------------------
  # extract hackkit archive

</pre>
</td></tr></table>

</ul>

<h2>インストール終了</h2>
<ul>
以上の手順で、ハックキットのインストールは完了です。
<p>
電源ボタンを長押しして LS-GL をシャットダウンします。
</ul>
]]>
      
   </content>
</entry>

<entry>
   <title>最初の設定</title>
   <link rel="alternate" type="text/html" href="http://www.yamasita.jp/linkstation/ls-gl/hackkit/settings.html" />
   <id>tag:www.yamasita.jp,2007:/linkstation/ls-gl/hackkit//7.411</id>
   
   <published>2007-07-28T19:00:00Z</published>
   <updated>2007-07-29T02:13:09Z</updated>
   
   <summary>debian 起動 S-ATA で接続していた標準ファームの HDD を取り外し...</summary>
   <author>
      <name></name>
      
   </author>
   
   
   <content type="html" xml:lang="ja" xml:base="http://www.yamasita.jp/linkstation/ls-gl/hackkit/">
      <![CDATA[<h2>debian 起動</h2>
<ul>
S-ATA で接続していた標準ファームの HDD を取り外し、<br>
USB 経由で接続していた実験用 HDD を LS-GL に S-ATA で接続します。
<p>
電源 ON で debian が起動してきます。
</ul>

<h2>ログイン</h2>
<ul>
telnet もしくはシリアルコンソールから guest でログインします。
guest のパスワードは hack です。
<pre>
Debian GNU/Linux 3.1 hackkit
hackkit login: <u>guest</u>
Password: <u>hack</u>（画面には表示されません）
Last login: Thu Jan 11 00:27:29 2007 from muramasaw.yamasita.jp on pts/0
Linux hackkit 2.6.12.6-arm1 #33 Tue Aug 8 17:16:04 JST 2006 armv5tejl GNU/Linux

The programs included with the Debian GNU/Linux system are free software;
the exact distribution terms for each program are described in the
individual files in /usr/share/doc/*/copyright.

Debian GNU/Linux comes with ABSOLUTELY NO WARRANTY, to the extent
permitted by applicable law.
No directory, logging in with HOME=/
guest@hackkit:/$
</pre>
</ul>

<h2>root になる</h2>
<ul>
<pre>
guest@hackkit:/$ <u>su - root</u>
Password: <u>hack</u>（画面には表示されません）
hackkit:~#
</pre>
root のパスワードも hack です。
</ul>

<h2>root のパスワード変更</h2>
<ul>
<pre>
hackkit:~# passwd root
Enter new UNIX password: <u>（新しいパスワード）</u>
Retype new UNIX password: <u>（もう一度新しいパスワード）</u>
passwd: password updated successfully
hackkit:~#
</pre>
変更後は、もう１つログインし、
<pre>
guest@hackkit:/$ <u>su - root</u>
Password: <u>（新しいパスワード）</u>
hackkit:~#
</pre>
で root になれることを確認しておくと良いでしょう。
</ul>

<h2>一般ユーザの作成</h2>
<ul>
guest は危ないので、別の（あなたの）ユーザを作成しておきます。
<h3>グループの作成</h3>
<ul>
<pre>
hackkit:~# <u>addgroup yamasita</u>
Adding group `yamasita' (1000)...
Done.
</pre>

</ul>
<h3>ホームディレクトリの作成</h3>
<ul>
<pre>
hackkit:~# <u>mkdir /home/yamasita</u>
hackkit:~#
</pre>
</ul>

<h3>ユーザの作成</h3>
<ul>
<pre>
hackkit:~# <u>adduser --home /home/yamasita/yasunari --ingroup yamasita yasunari</u>
Adding user `yasunari'...
Adding new user `yasunari' (1001) with group `yamasita'.
Creating home directory `/home/yamasita/yasunari'.
Copying files from `/etc/skel'
Enter new UNIX password: <u>（パスワード）</u>
Retype new UNIX password: <u>（もう一度パスワード）</u>
passwd: password updated successfully
Changing the user information for yasunari
Enter the new value, or press ENTER for the default
        Full Name []: <u>Yasunari Yamashita</u>
        Room Number []: <u>[Enter]</u>
        Work Phone []: <u>[Enter]</u>
        Home Phone []: <u>[Enter]</u>
        Other []:
Is the information correct? [y/N] <u>y</u>
hackkit:~#
</pre>
</ul>
</ul>

<h2>guest の削除</h2>
<ul>

再度ログインし直して、guest を消します
<pre>
Debian GNU/Linux 3.1 hackkit
hackkit login: <u>yasunari</u>
Password: <u>（パスワード）</u>
Linux hackkit 2.6.12.6-arm1 #33 Tue Aug 8 17:16:04 JST 2006 armv5tejl GNU/Linux

The programs included with the Debian GNU/Linux system are free software;
the exact distribution terms for each program are described in the
individual files in /usr/share/doc/*/copyright.

Debian GNU/Linux comes with ABSOLUTELY NO WARRANTY, to the extent
permitted by applicable law.
yasunari@hackkit:~$ <u>su - root</u>
Password: <u>パスワード</u>
hackkit:~# <u>deluser guest</u>
Removing user `guest'...
done.
hackkit:~# 
</pre>

</ul>
こんなところかな？
]]>
      
   </content>
</entry>

<entry>
   <title>パッケージのアップデート</title>
   <link rel="alternate" type="text/html" href="http://www.yamasita.jp/linkstation/ls-gl/hackkit/post.html" />
   <id>tag:www.yamasita.jp,2007:/linkstation/ls-gl/hackkit//7.412</id>
   
   <published>2007-07-28T20:00:00Z</published>
   <updated>2007-07-29T08:19:40Z</updated>
   
   <summary>apt を使って debian のパッケージを最新にアップデートします。 実行す...</summary>
   <author>
      <name></name>
      
   </author>
   
   
   <content type="html" xml:lang="ja" xml:base="http://www.yamasita.jp/linkstation/ls-gl/hackkit/">
      <![CDATA[apt を使って debian のパッケージを最新にアップデートします。<br>
実行する時期によって、下記以外にもアップデートされる場合があります。
<p>
インストール直後だけではなく、時々実行すると良いでしょう。

<h2>パッケージリストのアップデート</h2>
<ul>
まずはパッケージリストをアップデートします。
<pre>
hackkit:~# apt-get update
Get:1 http://ftp2.jp.debian.org etch Release.gpg [378B]
Get:2 http://ftp2.jp.debian.org proposed-updates Release.gpg [189B]
Get:3 http://ftp2.jp.debian.org etch/updates Release.gpg [189B]
	:
	:
	:
Hit http://security.debian.org etch/updates/non-free Sources
Fetched 511kB in 4s (119kB/s)
Reading package lists... Done
hackkit:~# 
</pre>
</ul>

<h2>パッケージのアップデート</h2>
<ul>
続いて更新されたパッケージをアップデートします。
<pre>
hackkit:~# apt-get upgrade
Reading package lists... Done
Building dependency tree... Done
0 upgraded, 0 newly installed, 0 to remove and 0 not upgraded.
hackkit:~# 
</pre>
この例では更新されたパッケージはありませんでした。
</ul>

<h2>掃除</h2>
<ul>
最後に、
取得、インストールしたパッケージファイルを掃除しておきます。
<pre>
hackkit:~# apt-get clean
hackkit:~#
</pre>
</ul>
]]>
      
   </content>
</entry>

<entry>
   <title>雑多な設定</title>
   <link rel="alternate" type="text/html" href="http://www.yamasita.jp/linkstation/ls-gl/hackkit/post_1.html" />
   <id>tag:www.yamasita.jp,2007:/linkstation/ls-gl/hackkit//7.414</id>
   
   <published>2007-07-30T11:00:00Z</published>
   <updated>2008-01-20T06:10:33Z</updated>
   
   <summary>インストール後の雑多な設定を行います。 ハックキットの不具合の対応とも言います（...</summary>
   <author>
      <name></name>
      
   </author>
   
   
   <content type="html" xml:lang="ja" xml:base="http://www.yamasita.jp/linkstation/ls-gl/hackkit/">
      <![CDATA[インストール後の雑多な設定を行います。<br>
ハックキットの不具合の対応とも言います（汗）

<hr>
ハックキット 2.0 の場合は以下の設定を実行します。

<h2>シャドウパスワード化</h2>
<ul>
セキュリティ向上のため、シャドウパスワード化しておくと良いでしょう。
<p>
ハックキットインストール直後は、
<pre>
hackkit:~# cat /etc/passwd
root:（暗号化されたパスワード）:0:0:root:/root:/bin/bash
	:
yasunari:（暗号化されたパスワード）:1001:1000:Yasunari Yamashita,,,:/home/yamasita/yasunari:/bin/bash
hackkit:~#
</pre>
と /etc/passwd に暗号化されたパスワードがそのまま入ってます。<br>
これをシャドウパスワード化します。
<pre>
hackkit:~# pwconv
hackkit:~#
</pre>
これで、/etc/passwd のパスワードフィールドは x になりました。
<pre>
hackkit:~# cat /etc/passwd
root:x:0:0:root:/root:/bin/bash
	:
yasunari:x:1001:1000:Yasunari Yamashita,,,:/home/yamasita/yasunari:/bin/bash
hackkit:~#
</pre>
</ul>

<h2>psmisc のインストール</h2>
<ul>
killall を動作させるため、psmisc パッケージをインストールします。
<pre>
hackkit:~# apt-get install psmisc
Reading package lists... Done
Building dependency tree... Done
The following NEW packages will be installed:
  psmisc
0 upgraded, 1 newly installed, 0 to remove and 0 not upgraded.
Need to get 79.7kB of archives.
After unpacking 275kB of additional disk space will be used.
Get:1 http://ftp2.jp.debian.org etch/main psmisc 22.3-1 [79.7kB]
Fetched 79.7kB in 0s (406kB/s)
Selecting previously deselected package psmisc.
(Reading database ... 8698 files and directories currently installed.)
Unpacking psmisc (from .../archives/psmisc_22.3-1_arm.deb) ...
Setting up psmisc (22.3-1) ...

hackkit:~#
</pre>
</ul>

<h2>nvi のアンインストール</h2>
<ul>
漢字が使えないのでアンインストールします。
<pre>
hackkit:~# dpkg -P nvi
(Reading database ... 10373 files and directories currently installed.)
Removing nvi ...
Purging configuration files for nvi ...
hackkit:~#
</pre>
</ul>

<h2>vim のインストール</h2>
<ul>
代りに vim をインストールします。
<pre>
hackkit:~# apt-get install vim
Reading package lists... Done
Building dependency tree... Done
The following extra packages will be installed:
  vim-common vim-runtime
Suggested packages:
  ctags vim-doc vim-scripts
The following NEW packages will be installed:
  vim vim-common vim-runtime
0 upgraded, 3 newly installed, 0 to remove and 0 not upgraded.
Need to get 7364kB of archives.
After unpacking 24.0MB of additional disk space will be used.
Do you want to continue [Y/n]? y
Get:1 http://ftp2.jp.debian.org etch/main vim-common 1:7.0-122+1etch2 [181kB]
Get:2 http://ftp2.jp.debian.org etch/main vim-runtime 1:7.0-122+1etch2 [6430kB]
Get:3 http://ftp2.jp.debian.org etch/main vim 1:7.0-122+1etch2 [752kB]
Fetched 7364kB in 1m16s (95.9kB/s)
Selecting previously deselected package vim-common.
(Reading database ... 10347 files and directories currently installed.)
Unpacking vim-common (from .../vim-common_1%3a7.0-122+1etch2_arm.deb) ...
Selecting previously deselected package vim-runtime.
Unpacking vim-runtime (from .../vim-runtime_1%3a7.0-122+1etch2_all.deb) ...
Selecting previously deselected package vim.
Unpacking vim (from .../vim_1%3a7.0-122+1etch2_arm.deb) ...
Setting up vim-common (7.0-122+1etch2) ...

Setting up vim-runtime (7.0-122+1etch2) ...
Processing /usr/share/vim/addons/doc

Setting up vim (7.0-122+1etch2) ...

hackkit:~#
</pre>
</ul>
<h2>電源ボタンで電源が落ちない場合</h2>
<ul>
電源ボタンで電源が落ちない場合は、
/usr/local/bin/kernelmon_exec.sh を入れ換えます。
<table border><tr><td><pre>
#!/bin/sh

if [ "$1" != micon_interrupts ]
then
        exit
fi

int=`/usr/local/sbin/miconapl -a int_get_switch_status | sed -n -e 's/^int=\(.*\)$/\1/p'`
if [ "$int" = power_sw ]
then
        shutdown -h now
fi
</pre></td></tr></table>
chmod +x /usr/local/bin/kernelmon_exec.sh も忘れずに。
<p>
<a href="kernelmon_exec.sh.tar.gz">kernelmon_exec.sh.tar.gz</a>
</ul>
]]>
      
   </content>
</entry>

<entry>
   <title>追加パッケージのインストール</title>
   <link rel="alternate" type="text/html" href="http://www.yamasita.jp/linkstation/ls-gl/hackkit/post_2.html" />
   <id>tag:www.yamasita.jp,2007:/linkstation/ls-gl/hackkit//7.415</id>
   
   <published>2007-07-31T11:00:00Z</published>
   <updated>2007-07-31T11:01:11Z</updated>
   
   <summary>必要に応じてパッケージをインストールします。 nkf sil:~# apt-ge...</summary>
   <author>
      <name></name>
      
   </author>
   
   
   <content type="html" xml:lang="ja" xml:base="http://www.yamasita.jp/linkstation/ls-gl/hackkit/">
      <![CDATA[必要に応じてパッケージをインストールします。

<h2>nkf</h2>
<ul>
<pre>
sil:~# apt-get install nkf
Reading package lists... Done
Building dependency tree... Done
The following NEW packages will be installed:
  nkf
0 upgraded, 1 newly installed, 0 to remove and 0 not upgraded.
Need to get 0B/118kB of archives.
After unpacking 239kB of additional disk space will be used.
Selecting previously deselected package nkf.
(Reading database ... 8789 files and directories currently installed.)
Unpacking nkf (from .../archives/nkf_2.07-1_arm.deb) ...
Setting up nkf (2.07-1) ...
sil:~#
</pre>
</ul>

<h3>ftp</h3>
<ul>
<pre>
sil:~# apt-get install ftp
Reading package lists... Done
Building dependency tree... Done
The following NEW packages will be installed:
  ftp
0 upgraded, 1 newly installed, 0 to remove and 0 not upgraded.
Need to get 53.9kB of archives.
After unpacking 160kB of additional disk space will be used.
Get:1 http://ftp2.jp.debian.org etch/main ftp 0.17-16 [53.9kB]
Fetched 53.9kB in 2s (20.0kB/s)
Selecting previously deselected package ftp.
(Reading database ... 8800 files and directories currently installed.)
Unpacking ftp (from .../archives/ftp_0.17-16_arm.deb) ...
Setting up ftp (0.17-16) ...
sil:~# 
</pre>
</ul>]]>
      
   </content>
</entry>

<entry>
   <title>時刻同期</title>
   <link rel="alternate" type="text/html" href="http://www.yamasita.jp/linkstation/ls-gl/hackkit/post_3.html" />
   <id>tag:www.yamasita.jp,2007:/linkstation/ls-gl/hackkit//7.416</id>
   
   <published>2007-08-01T11:00:00Z</published>
   <updated>2008-03-08T05:37:28Z</updated>
   
   <summary>ntpd を動作させて時刻を同期します。 ntpd のインストール apt-ge...</summary>
   <author>
      <name></name>
      
   </author>
   
   
   <content type="html" xml:lang="ja" xml:base="http://www.yamasita.jp/linkstation/ls-gl/hackkit/">
      <![CDATA[ntpd を動作させて時刻を同期します。

<h2>ntpd のインストール</h2>
<ul>
apt-get を使用して ntpd をインストールします。
<pre>
sil:~# apt-get install ntp
Reading package lists... Done
Building dependency tree... Done
The following extra packages will be installed:
  perl perl-modules
Suggested packages:
  ntp-doc libterm-readline-gnu-perl libterm-readline-perl-perl
Recommended packages:
  perl-doc
The following NEW packages will be installed:
  ntp perl perl-modules
0 upgraded, 3 newly installed, 0 to remove and 0 not upgraded.
Need to get 6064kB of archives.
After unpacking 24.9MB of additional disk space will be used.
Do you want to continue [Y/n]? y
Get:1 http://ftp2.jp.debian.org etch/main perl-modules 5.8.8-7 [2310kB]
Get:2 http://ftp2.jp.debian.org etch/main perl 5.8.8-7 [3413kB]
Get:3 http://ftp2.jp.debian.org etch/main ntp 1:4.2.2.p4+dfsg-2 [342kB]
Fetched 6064kB in 7s (798kB/s)
Selecting previously deselected package perl-modules.
(Reading database ... 8810 files and directories currently installed.)
Unpacking perl-modules (from .../perl-modules_5.8.8-7_all.deb) ...
Selecting previously deselected package perl.
Unpacking perl (from .../archives/perl_5.8.8-7_arm.deb) ...
Selecting previously deselected package ntp.
Unpacking ntp (from .../ntp_1%3a4.2.2.p4+dfsg-2_arm.deb) ...
Setting up perl-modules (5.8.8-7) ...
Setting up perl (5.8.8-7) ...
Starting NTP server: ntpd.
sil:~#
</pre>
</ul>

<h2>ntp.conf の修正</h2>
<ul>
国内のサーバと同期するよう修正します。<br>
お使いの ISP が提供している NTP サーバを指定すると良いでしょう。
<pre>
sil:~# cd /etc
sil:/etc# mv ntp.conf ntp.conf.orig
sil:/etc# cp ntp.conf.orig ntp.conf
sil:/etc# ls -l ntp.conf*
-rw-r--r-- 1 root root 1582 Jul  6 23:44 ntp.conf
-rw-r--r-- 1 root root 1582 Mar  4 22:58 ntp.conf.orig
sil:/etc# vi ntp.conf
	:
	:
sil:/etc# diff -c ntp.conf.orig ntp.conf
*** ntp.conf.orig       Sun Mar  4 22:58:52 2007
--- ntp.conf    Fri Jul  6 23:46:38 2007
***************
*** 11,25 ****

  # You do need to talk to an NTP server or two (or three).
  #server ntp.your-provider.example

  # pool.ntp.org maps to more than 300 low-stratum NTP servers.
  # Your server will pick a different set every time it starts up.
  #  *** Please consider joining the pool! ***
  #  *** <http://www.pool.ntp.org/join.html> ***
! server 0.debian.pool.ntp.org iburst
! server 1.debian.pool.ntp.org iburst
! server 2.debian.pool.ntp.org iburst
! server 3.debian.pool.ntp.org iburst

  # By default, exchange time with everybody, but don't allow configuration.
  # See /usr/share/doc/ntp-doc/html/accopt.html for details.
--- 11,29 ----

  # You do need to talk to an NTP server or two (or three).
  #server ntp.your-provider.example
+ server  ntp3.jst.mfeed.ad.jp
+ server  ntp2.jst.mfeed.ad.jp
+ server  ntp1.jst.mfeed.ad.jp
+ server  link.yamasita.jp

  # pool.ntp.org maps to more than 300 low-stratum NTP servers.
  # Your server will pick a different set every time it starts up.
  #  *** Please consider joining the pool! ***
  #  *** <http://www.pool.ntp.org/join.html> ***
! #server 0.debian.pool.ntp.org iburst
! #server 1.debian.pool.ntp.org iburst
! #server 2.debian.pool.ntp.org iburst
! #server 3.debian.pool.ntp.org iburst

  # By default, exchange time with everybody, but don't allow configuration.
  # See /usr/share/doc/ntp-doc/html/accopt.html for details.
sil:/etc#
</pre>
</ul>

<h2>ntpd の再起動</h2>
<ul>
ntpd に設定を読込ませるため、ntpd を再起動します。
<pre>
sil:/etc# /etc/init.d/ntp restart
Stopping NTP server: ntpd.
Starting NTP server: ntpd.
sil:/etc# ntpq -p
     remote           refid      st t when poll reach   delay   offset  jitter
==============================================================================
 ntp3.jst.mfeed. 210.173.160.56   2 u    1   64    1   11.589   -7.476   0.015
 ntp2.jst.mfeed. .INIT.          16 u    -   64    0    0.000    0.000   0.015
 ntp1.jst.mfeed. .INIT.          16 u    -   64    0    0.000    0.000   0.015
 link.yamasita.j .INIT.          16 u    -   64    0    0.000    0.000   0.015
sil:/etc#
</pre>
しばらくすると、同期します。
<pre>
sil:/etc# ntpq -p
     remote           refid      st t when poll reach   delay   offset  jitter
==============================================================================
*ntp3.jst.mfeed. 210.173.160.56   2 u   57   64  377   11.410   94.391  97.586
+ntp2.jst.mfeed. 210.173.160.56   2 u   50   64  377   11.154   -7.658 130.848
+ntp1.jst.mfeed. 210.173.160.86   2 u   48   64  377   11.339   -7.612 130.780
xlink.yamasita.j 210.173.160.27   3 u   48   64  377    0.374  221.923 174.693
sil:/etc#
</pre>
</ul>
]]>
      
   </content>
</entry>

<entry>
   <title>Windows 向けファイルサーバ</title>
   <link rel="alternate" type="text/html" href="http://www.yamasita.jp/linkstation/ls-gl/hackkit/windows.html" />
   <id>tag:www.yamasita.jp,2007:/linkstation/ls-gl/hackkit//7.417</id>
   
   <published>2007-08-02T12:00:00Z</published>
   <updated>2007-08-02T12:01:11Z</updated>
   
   <summary>samba をインストールして、Windows のファイルサーバにします。 sa...</summary>
   <author>
      <name></name>
      
   </author>
   
   
   <content type="html" xml:lang="ja" xml:base="http://www.yamasita.jp/linkstation/ls-gl/hackkit/">
      <![CDATA[samba をインストールして、Windows のファイルサーバにします。
<h2>samba のインストール</h2>
<ul>
<pre>
sil:~# apt-get install samba
	:
</pre>
WORKGROUP はお使いのワークグループ名を、それ以外はデフォルトを指定します。 
</ul>

<h2>smb.conf の修正</h2>
<ul>
/etc/samba/smb.conf を修正して /mnt を共有します。 
<pre>
sil:~# cd /etc/samba
sil:/etc/samba# mv smb.conf smb.conf.orig
sil:/etc/samba# cp smb.conf.orig smb.conf
sil:/etc/samba# vi smb.conf
	:
	:
sil:/etc/samba# diff -c smb.conf.orig smb.conf
*** smb.conf.orig       Sun Jul  1 17:15:44 2007
--- smb.conf    Sun Jul  1 22:05:06 2007
***************
*** 303,305 ****
--- 303,309 ----
  ;   preexec = /bin/mount /cdrom
  ;   postexec = /bin/umount /cdrom

+ [sil]
+       comment = HS-DHGL share
+       path = /mnt
+       writable = Yes
sil:/etc/samba#
</pre>
修正が終われば smb.conf を再読込みします。 
<pre>
sil:/etc/samba# /etc/init.d/samba reload
Reloading /etc/samba/smb.conf: smbd only.
sil:/etc/samba#
</pre>
</ul>

<h2>ユーザの作成</h2>
<ul>
<pre>
sil:/etc/samba# smbpasswd -a yasunari
New SMB password:
Retype new SMB password:
sil:/etc/samba#
</pre>
</ul>
<h2>確認</h2>
<ul>
Windows エクスプローラから \\sil\sil がアクセスできることを確認します。 
</ul>
]]>
      
   </content>
</entry>

<entry>
   <title>Windows 向けプリンタサーバ(HS-DHGL のみ)</title>
   <link rel="alternate" type="text/html" href="http://www.yamasita.jp/linkstation/ls-gl/hackkit/windows_1.html" />
   <id>tag:www.yamasita.jp,2007:/linkstation/ls-gl/hackkit//7.419</id>
   
   <published>2007-08-04T03:18:00Z</published>
   <updated>2007-08-23T06:34:04Z</updated>
   
   <summary>Windows のプリンタサーバにします。 samba を使用しますので、 Wi...</summary>
   <author>
      <name></name>
      
   </author>
   
   
   <content type="html" xml:lang="ja" xml:base="http://www.yamasita.jp/linkstation/ls-gl/hackkit/">
      <![CDATA[Windows のプリンタサーバにします。<br>
samba を使用しますので、
<a href="/linkstation/ls-gl/hackkit/windows.html">
Windows 向けファイルサーバ</a>の手順で samba が動作していることを
前提とします。

<h2>カーネルモジュールのロード</h2>
<ul>
標準ファームに含まれる USB プリンタモジュールをロードするよう設定します。

<h3>/etc/init.d/buffalodaemon への追加</h3>
<ul>
起動時にロードできるよう、/etc/init.d/buffalodaemon に
カーネルモジュールをロードするステップを追加します。
<pre>
sil:/etc/init.d# diff -c buffalodaemon.orig buffalodaemon
*** buffalodaemon.orig  2007-07-01 03:38:57.785866000 +0900
--- buffalodaemon       2007-07-15 00:34:07.381772735 +0900
***************
*** 3,8 ****
--- 3,9 ----
  case "$1" in
    start)
        chroot /usr/local/buffalo mount /proc
+       chroot /usr/local/buffalo insmod "/lib/modules/usblp.ko"

        for prog in httpd.sh pcastd.sh epg.sh clientUtil_servd.sh ltbootd.sh
        do
sil:/etc/init.d#
</pre>
</ul>

<h3>モジュールのロード</h3>
<ul>
HS-DHGL を再起動するか、
chroot /usr/local/buffalo insmod "/lib/modules/usblp.ko" を実行して、
USB プリンタモジュールをロードします。
</ul>

<h3>認識の確認</h3>
<ul>
USB プリンタを接続します。
/var/log/messages に認識されたログが残れば OK です。
<pre>
Jul 15 00:28:16 sil kernel: drivers/usb/class/usblp.c: usblp0: USB Bidirectional printer dev 2 if 0 alt 0 proto 2 vid 0x04B8 pid 0x0005
Jul 15 00:28:16 sil kernel: usbcore: registered new driver usblp
Jul 15 00:28:16 sil kernel: drivers/usb/class/usblp.c: v0.13: USB Printer Device Class driver
</ul>
</ul>

<h2>スプーラのインストール</h2>
<ul>
デバイスを認識したので、次はスプーラをインストールします。<br>
最近ですと cups ですが、、、、
ここでは lprng をインストールします。

<h3>lprng のインストール</h3>
<ul>
（注）ここでは、LANG の設定をしていたので、
日本語でメッセージが表示されています。
<pre>
sil:~# apt-get install lprng
パッケージリストを読み込んでいます... 完了
依存関係ツリーを作成しています... 完了
提案パッケージ:
  magicfilter lprng-doc
以下のパッケージが新たにインストールされます:
  lprng
アップグレード: 0 個、新規インストール: 1 個、削除: 0 個、保留: 0 個。
1891kB のアーカイブを取得する必要があります。
展開後に追加で 4047kB のディスク容量が消費されます。
取得:1 http://ftp2.jp.debian.org etch/main lprng 3.8.28dfsg.1-1.1 [1891kB]
1891kB を 1s で取得しました (966kB/s)
	:
</pre>

「システム起動時に lpd (プリンタデーモン) を立ち上げますか?」には
「はい」と答えます。
<pre>
未選択パッケージ lprng を選択しています。
(データベースを読み込んでいます ... 現在 11776 個のファイルとディレクトリがインストールされています。)
(.../lprng_3.8.28dfsg.1-1.1_arm.deb から) lprng を展開しています...
preinst called with unknown argument `'
lprng (3.8.28dfsg.1-1.1) を設定しています ...

sil:~#
</pre>
</ul>

<h3>printcap の作成</h3>
<ul>
/etc/printcap を作成します。
<pre>
sil:~# cat /etc/printcap
# /etc/printcap
#
# Please don't edit this file directly unless you know what you are doing!
# Be warned that the control-panel printtool requires a very strict format!
# Look at the printcap(5) man page for more info.
#
# This file can be edited with the printtool in the control-panel.

lp:\
        :sd=/var/spool/lpd/lp:\
        :mx#0:\
        :sh:\
        :lp=/dev/usb/lp0:
sil:~#
</pre>
</ul>

<h3>オーナ、モードの修正</h3>
<ul>
/dev/usb/lp0 のオーナ、モードを修正します。
<pre>
sil:~# chgrp lp /dev/usb/lp0
sil:~# chmod 666 /dev/usb/lp0
sil:~#
</pre>
</ul>

</ul>

<h2>samba の設定</h2>
<ul>
UNIX 的な設定が終わったので、今度は samba の設定を行い、
Windows プリンタサーバとします。
<h3>smb.conf の修正</h3>
<ul>
/etc/samba/smb.conf を修正します。
<pre>
sil:/etc/samba# diff -c smb.conf_notprint smb.conf
*** smb.conf_notprint   Sun Jul  1 22:16:17 2007
--- smb.conf    Sun Jul 15 01:59:45 2007
***************
*** 165,172 ****

  # lpr(ng) printing. You may wish to override the location of the
  # printcap file
! ;   printing = bsd
! ;   printcap name = /etc/printcap

  # CUPS printing.  See also the cupsaddsmb(8) manpage in the
  # cupsys-client package.
--- 165,172 ----

  # lpr(ng) printing. You may wish to override the location of the
  # printcap file
!    printing = bsd
!    printcap name = /etc/printcap

  # CUPS printing.  See also the cupsaddsmb(8) manpage in the
  # cupsys-client package.
***************
*** 271,276 ****
--- 271,277 ----
     public = no
     writable = no
     create mode = 0700
+    use client driver = yes

  # Windows clients look for this share name as a source of downloadable
  # printer drivers
sil:/etc/samba#
</pre>
</ul>

<h3>smb.conf の再読込み</h3>
<ul>
修正した smb.conf を samba に読込ませます。
<pre>
sil:/etc/samba# /etc/init.d/samba reload
Reloading /etc/samba/smb.conf: smbd only.
sil:/etc/samba#
</pre>
</ul>
</ul>

<h2>確認</h2>
<ul>
Windows マシンで確認を行います。
<h3>プリンタのセットアップ</h3>
<ul>
Windows 側に新しいプリンタとの接続を設定します<br>
・リモートプリンタとして、\\hackkit\lp を指定します<br>
・プリンタの機種として、PM-870C（お使いの機種）を指定します。<br>
具体的な設定方法は、、、、 Windows の数だけ説明が必要なので、省略します。 
</ul>

<h3>テスト印字</h3>
<ul>
Windows マシンからテスト印字を実行し、問題なく印刷できれば完了です。
</ul>
</ul>
<hr>
<h2>参考ハックの記録</h2>
<ul>
<a href="/linkstation/2007/07/070720_post_36.html">プリンタサーバ</a>
</ul>
]]>
      
   </content>
</entry>

<entry>
   <title>開発環境のインストール</title>
   <link rel="alternate" type="text/html" href="http://www.yamasita.jp/linkstation/ls-gl/hackkit/post_4.html" />
   <id>tag:www.yamasita.jp,2007:/linkstation/ls-gl/hackkit//7.472</id>
   
   <published>2007-09-24T11:00:00Z</published>
   <updated>2007-11-04T07:12:23Z</updated>
   
   <summary>C 言語で書かれたソースをコンパイルするためには 開発環境をインストールしておく...</summary>
   <author>
      <name></name>
      
   </author>
   
   
   <content type="html" xml:lang="ja" xml:base="http://www.yamasita.jp/linkstation/ls-gl/hackkit/">
      <![CDATA[C 言語で書かれたソースをコンパイルするためには
開発環境をインストールしておく必要があります。<br>
ここでは、最低限の開発環境をインストールします。

<h2>開発環境のインストール</h2>
<ul>
make, gcc, libc6-dev および
付随するパッケージをインストールします。<br>
コンパイルするモノによって他にもパッケージが必要な場合があります。
<pre>
sil:~# apt-get install make gcc libc6-dev
Reading package lists... Done
Building dependency tree... Done
The following extra packages will be installed:
  binutils cpp cpp-4.1 gcc-4.1 libssp0 linux-kernel-headers
Suggested packages:
  binutils-doc cpp-doc gcc-4.1-locales manpages-dev autoconf automake1.9 libtool flex bison gdb gcc-doc gcc-4.1-doc
  glibc-doc make-doc-non-dfsg
Recommended packages:
  libmudflap0-dev
The following NEW packages will be installed:
  binutils cpp cpp-4.1 gcc gcc-4.1 libc6-dev libssp0 linux-kernel-headers make
0 upgraded, 9 newly installed, 0 to remove and 0 not upgraded.
Need to get 9284kB of archives.
After unpacking 33.1MB of additional disk space will be used.
Do you want to continue [Y/n]? y
Get:1 http://ftp2.jp.debian.org etch/main binutils 2.17-3 [2485kB]
Get:2 http://ftp2.jp.debian.org etch/main cpp-4.1 4.1.1-21 [2006kB]
Get:3 http://ftp2.jp.debian.org etch/main cpp 4:4.1.1-15 [11.6kB]
Get:4 http://ftp2.jp.debian.org etch/main libssp0 4.1.1-21 [4224B]
Get:5 http://ftp2.jp.debian.org etch/main gcc-4.1 4.1.1-21 [403kB]
Get:6 http://ftp2.jp.debian.org etch/main gcc 4:4.1.1-15 [5062B]
Get:7 http://ftp2.jp.debian.org etch/main linux-kernel-headers 2.6.18-7 [1986kB]
Get:8 http://ftp2.jp.debian.org etch/main libc6-dev 2.3.6.ds1-13etch2 [2002kB]
Get:9 http://ftp2.jp.debian.org etch/main make 3.81-2 [381kB]
Fetched 9284kB in 1m39s (93.4kB/s)
Selecting previously deselected package binutils.
(Reading database ... 11833 files and directories currently installed.)
Unpacking binutils (from .../binutils_2.17-3_arm.deb) ...
Selecting previously deselected package cpp-4.1.
Unpacking cpp-4.1 (from .../cpp-4.1_4.1.1-21_arm.deb) ...
Selecting previously deselected package cpp.
Unpacking cpp (from .../cpp_4%3a4.1.1-15_arm.deb) ...
Selecting previously deselected package libssp0.
Unpacking libssp0 (from .../libssp0_4.1.1-21_arm.deb) ...
Selecting previously deselected package gcc-4.1.
Unpacking gcc-4.1 (from .../gcc-4.1_4.1.1-21_arm.deb) ...
Selecting previously deselected package gcc.
Unpacking gcc (from .../gcc_4%3a4.1.1-15_arm.deb) ...
Selecting previously deselected package linux-kernel-headers.
Unpacking linux-kernel-headers (from .../linux-kernel-headers_2.6.18-7_arm.deb) ...
Selecting previously deselected package libc6-dev.
Unpacking libc6-dev (from .../libc6-dev_2.3.6.ds1-13etch2_arm.deb) ...
Selecting previously deselected package make.
Unpacking make (from .../archives/make_3.81-2_arm.deb) ...
Setting up binutils (2.17-3) ...

Setting up cpp-4.1 (4.1.1-21) ...
Setting up cpp (4.1.1-15) ...

Setting up libssp0 (4.1.1-21) ...

Setting up gcc-4.1 (4.1.1-21) ...
Setting up gcc (4.1.1-15) ...

Setting up linux-kernel-headers (2.6.18-7) ...
Setting up libc6-dev (2.3.6.ds1-13etch2) ...
Setting up make (3.81-2) ...
sil:~#
</pre>

</ul>
<h2>確認</h2>
<ul>
てきとーなサンプルをコンパイルして確認します。
<pre>
yasunari@sil:/tmp$ echo 'main() { printf("Why DO NOT you hack HS-DHGL?\n");}'　>a.c
yasunari@sil:/tmp$ cc a.c
a.c: In function 'main':
a.c:1: warning: incompatible implicit declaration of built-in function 'printf'
yasunari@sil:/tmp$ ./a.out
Why DO NOT you hack HS-DHGL?
yasunari@sil:/tmp$
</pre>
上のように"Why DO NOT you hack HS-DHGL?"と表示されればＯＫです。

</ul>
]]>
      
   </content>
</entry>

<entry>
   <title>ftp サーバ</title>
   <link rel="alternate" type="text/html" href="http://www.yamasita.jp/linkstation/ls-gl/hackkit/ftp.html" />
   <id>tag:www.yamasita.jp,2007:/linkstation/ls-gl/hackkit//7.485</id>
   
   <published>2007-10-06T12:00:00Z</published>
   <updated>2008-01-25T13:31:43Z</updated>
   
   <summary>必要に応じて ftp サーバをセットアップします。 inetutils-ftpd...</summary>
   <author>
      <name></name>
      
   </author>
   
   
   <content type="html" xml:lang="ja" xml:base="http://www.yamasita.jp/linkstation/ls-gl/hackkit/">
      <![CDATA[必要に応じて ftp サーバをセットアップします。

<h2>inetutils-ftpd のインストール</h2>
<ul>
inetutils-ftpd パッケージをインストールします。
<pre>
hackkit:~# apt-get install inetutils-ftpd
Reading package lists... Done
Building dependency tree... Done
The following NEW packages will be installed:
  inetutils-ftpd
0 upgraded, 1 newly installed, 0 to remove and 0 not upgraded.
Need to get 91.6kB of archives.
After unpacking 193kB of additional disk space will be used.
Get:1 http://ftp2.jp.debian.org etch/main inetutils-ftpd 2:1.5.dfsg.1-2 [91.6kB]
Fetched 91.6kB in 1s (72.2kB/s)
Selecting previously deselected package inetutils-ftpd.
(Reading database ... 14328 files and directories currently installed.)
Unpacking inetutils-ftpd (from .../inetutils-ftpd_2%3a1.5.dfsg.1-2_arm.deb) ...
Setting up inetutils-ftpd (1.5.dfsg.1-2) ...
hackkit:~#
</pre>

</ul>
<h2>/etc/inetd.cof への追加</h2>
<ul>
ftp の接続要求に対して ftpd が起動するよう inetd.conf に
設定を追加します。
<pre>
hackkit:~# echo "ftp     stream  tcp     nowait  root    /usr/sbin/tcpd  ftpd" >> /etc/inetd.conf
hackkit:~#
</pre>
追加できたか確認します。
<pre>
hackkit:~# tail /etc/inetd.conf

#:RPC: RPC based services

#:HAM-RADIO: amateur-radio services

#:OTHER: Other services
#<off># netbios-ssn     stream  tcp     nowait  root    /usr/sbin/tcpd  /usr/sbin/smbd
rsync   stream  tcp     nowait  root    /usr/sbin/tcpd /usr/bin/rsync --daemon

ftp     stream  tcp     nowait  root    /usr/sbin/tcpd  ftpd
hackkit:~#
</pre>
最後に ftp の行があればＯＫです。

</ul>
<h2>inetd.conf の再読込み</h2>
<ul>
inetd に inetd.conf を読込み直させます。
<pre>
hackkit:~# kill -HUP `cat /var/run/inetd.pid `
hackkit:~#
</pre>

</ul>
<h2>確認</h2>
<ul>
ftp で接続できるか確認します。

<pre>
hackkit:~# ftp localhost
Connected to localhost.
220 hackkit FTP server (GNU inetutils 1.5) ready.
Name (localhost:yasunari): 
331 Password required for yasunari.
Password:
230- Linux hackkit 2.6.16.16-arm1 #9 Wed Mar 7 14:17:36 JST 2007 armv5tejl
230-
230- The programs included with the Debian GNU/Linux system are free software;
230- the exact distribution terms for each program are described in the
230- individual files in /usr/share/doc/*/copyright.
230-
230- Debian GNU/Linux comes with ABSOLUTELY NO WARRANTY, to the extent
230- permitted by applicable law.
230 User yasunari logged in.
Remote system type is UNIX.
Using binary mode to transfer files.
ftp> quit
221 Goodbye.
hackkit:~#
</pre>

ログインできれば設定完了です。
</ul>
]]>
      
   </content>
</entry>

<entry>
   <title>dhcp サーバ</title>
   <link rel="alternate" type="text/html" href="http://www.yamasita.jp/linkstation/ls-gl/hackkit/dhcp.html" />
   <id>tag:www.yamasita.jp,2007:/linkstation/ls-gl/hackkit//7.523</id>
   
   <published>2007-11-07T10:00:00Z</published>
   <updated>2008-03-08T05:25:40Z</updated>
   
   <summary>必要に応じて dhcp サーバをセットアップします。  dhcp サーバのインス...</summary>
   <author>
      <name></name>
      
   </author>
   
   
   <content type="html" xml:lang="ja" xml:base="http://www.yamasita.jp/linkstation/ls-gl/hackkit/">
      <![CDATA[必要に応じて dhcp サーバをセットアップします。 

<h2>dhcp サーバのインストール</h2>
<ul>
apt-get で dhcp パッケージをインストールします。
<pre>
hackkit:~# apt-get install dhcp
Reading package lists... Done
Building dependency tree... Done
The following NEW packages will be installed:
  dhcp
0 upgraded, 1 newly installed, 0 to remove and 3 not upgraded.
Need to get 114kB of archives.
After unpacking 340kB of additional disk space will be used.
Get:1 http://ftp2.jp.debian.org proposed-updates/main dhcp 2.0pl5-19.5etch2 [114kB]
Fetched 114kB in 0s (437kB/s)
Selecting previously deselected package dhcp.
(Reading database ... 14333 files and directories currently installed.)
Unpacking dhcp (from .../dhcp_2.0pl5-19.5etch2_arm.deb) ...
Setting up dhcp (2.0pl5-19.5etch2) ...
Generating /etc/default/dhcp...

Please note that if you are installing the DHCP server for the first
time you need to configure it first. Please stop (/etc/init.d/dhcp
stop) the DHCP server daemon, edit /etc/dhcpd.conf to suit your needs
and particular configuration, and restart the DHCP server daemon
(/etc/init.d/dhcp start).

You also need to edit /etc/default/dhcp to specify the interfaces dhcpd
should listen to. By default it listens to eth0.

NOTE: dhcpd's messages are being sent to syslog. Look there for
diagnostics messages.

Starting DHCP server: dhcpd failed to start - check syslog for diagnostics.

hackkit:~#
</pre>
</ul>

<h2>dhcp サーバのコンフィギュレーション</h2>
<ul>
<h3>dhcp サーバの停止</h3>
<ul>
まずは、メッセージ通りに dhcpd を止めます。
<pre>
hackkit:~# /etc/init.d/dhcp stop
Stopping DHCP server: dhcp.
hackkit:~#
</pre>


</ul>
<h3>/etc/dhcpd.conf</h3>
<ul>
各 IP アドレスは必要に応じて書き換えます。<br>
<pre>
subnet 192.168.1.0 netmask 255.255.255.0 {
# --- default gateway
        option routers                  192.168.1.1;
        option subnet-mask              255.255.255.0;

        option domain-name              "example.jp";
        option domain-name-servers      192.168.1.30, 192.168.1.2;

        option ntp-servers              192.168.1.30, 192.168.1.2;

        range dynamic-bootp 192.168.1.121 192.168.1.129;
        default-lease-time 21600;
        max-lease-time 43200;

#host panerina {
#        hardware ethernet 00:07:40:e8:12:xx;
#        fixed-address 192.168.1.24;
#}

#host psp {
#        hardware ethernet 00:02:c7:ce:16:xx;
#        fixed-address 192.168.1.52;
#}
}
</pre>

</ul>
<h3>/etc/default/dhcp</h3>
<ul>
特に書き換える必要はありません。
<pre>
hackkit:/etc# cat /etc/default/dhcp
# Defaults for dhcp initscript
# sourced by /etc/init.d/dhcp
# installed at /etc/default/dhcp by the maintainer scripts

#
# This is a POSIX shell fragment
#

# On what interfaces should the DHCP server (dhcpd) serve DHCP requests?
#       Separate multiple interfaces with spaces, e.g. "eth0 eth1".
INTERFACES=""
hackkit:/etc#
</pre>
</ul>
</ul>
<h2>dhcp サーバの起動</h2>
<ul>
<pre>
hackkit:/etc# /etc/init.d/dhcp start
Starting DHCP server: dhcpd.
hackkit:/etc# 
</pre>
syslog にエラーが出ていないか確認します。
<pre>
hackkit:/etc# tail /var/log/daemon.log
	:
</pre>
</ul>

<h2>確認</h2>
<ul>
/var/log/daemon.log を監視しつつ
アドレスを自動取得する設定にした PC などの電源を入れます。
<pre>
hackkit:/var# tail -f /var/log/daemon.log
	:
Nov  4 15:29:32 hackkit dhcpd: DHCPREQUEST for 192.168.1.24 from 00:07:40:e8:12:ea via eth0
Nov  4 15:29:32 hackkit dhcpd: DHCPACK on 192.168.1.24 to 00:07:40:e8:12:ea via eth0
</pre>
など、dhcpd のログが出力されていれば OK です。
</ul>
<hr>
<h2>参考ハックの記録</h2>
<ul>
<a href="/linkstation/2007/11/071106_dhcp.html">
dhcp サーバのインストール</a>
</ul>

]]>
      
   </content>
</entry>

</feed>


